1:6 Darth Vader 3D Laser Scan & Print Project

Custom One-Sixth Figures Forum

Help Support Custom One-Sixth Figures Forum:

This site may earn a commission from merchant affiliate links, including eBay, Amazon, and others.
Okay... decided to show the chest armor paint-up anyway. Not perfect. The trick is to go lightly on the two black bars with the U shapes, but I may have gone a little heavy handed. But they definitely drybrushed that area too to dull down the shine of the gloss black and give it a more metallic appearance.

Print-11-022.jpg
 
Filing down the edges of the dome rim. Damn this material is tough. Took two days to file down what was roughly a 2mm's worth of excess material around the rim. At one place though it opened up a hole and some liquid came out. I wonder if it is uncured printing resin or maybe filler? Well, I squeezed some of it out and once I've cleaned the inner surface I'll seal it with apoxie sculpt. Just kinda weird. So basically now I just need to sharpen the center ridge and the dividing line between the top and bottom of the dome and it should be ready for putty primer in few select areas to remove that scan assembly flaw and then it's ready for molding.

Gonna work some more on filing away the excess material on the chest armor and then it's off to the other parts. Though... the excess on the armor is gonna be a PITA, as it's already taken 3 days or work without much to show for it.

Though... a days work amounts to a few quarters of an hour with long breaks in between, as I lose my strength fairly quickly doing that kind of work.
I've had defective resin statues in the past where the mix was off and they would ooze liquid form a particular point. The statue looked solid but you'd catch the it coming through the same spot even through the paint. I hope you don't have this problem but you may want to look into it before you do too much work. Maybe some experts on TPF have some better advice.
 
While working on the prints I'm also using some of the previously cast parts to create a bust. I have all the parts, but just need to do some modding as I'm thinking I'll make it a one-piece kinda deal, so armor, shoulder and helmet with perhaps the cape holding the rest up from the ground. Some busts I saw online also had the chest box... but I'm thinking it just gets too big if I add that piece as well.

Bust-001.jpg
 
I do too. I'll probably not be able to paint them, but can't wait to see others paint up the casts.

Have also been working on another project. A symmetrical version of the OT Vader helmet. I'm currently in the progress of having the scan I did made symmetrical by a very talented 3D modeler, so that's going to be interesting.

I've always been interested in seeing how the symmetrical versions of the iconic Star Wars helmets would look. I set out several years ago to create symmetrical images, by taking a picture, mirroring it and put it on top of the regular version, then doing a 50% opacity of the top layer in Photoshop which resulted in a fairly symmetrical picture. However, it wasn't perfect as things that didn't line up very well wasn't pulled together to form an average, so the early symmetrical versions were sort of approximates of how it could look.

Now, recently, I was prompted to start up this project again and found a program that could morph between two images and create a segment of images of picture A in the process of morphing into picture B. I used that in the same way I did the Photoshop images - took a picture of Vader, mirrored it and loaded both versions into the program, where I had to place a whole lot of position markers on one picture and correct them on the other, so a point in one picture would correspond to the other. Took forever and a day to do the morph render, but the finished picture ended up looking like this.

Enjoy.

Vader-NHM-All2.jpg
 
First casts have been attempted. First batch I used too little resin so didn't fill out the mold, but it took out most of the gonk that was in the molds. Nice. It's surprisingly little resin you need to make the helmet casts. I had to make pour sprouts as the molds didn't have them. Those will have to be trimmed away by whoever buys one of these, and since the pieces are really thin, it has to be done carefully.

Seeing how the casts turned out I'm thinking they'll work best as RotJ versions due to their overall sanitized look. Mainly due to my repair work on the master casts that left them a little too cleaned up, I'm afraid. But it works well for the RotJ look. One minor issue though is that the eye socket depths are ESB style, whereas the lenses sat further forward in RotJ (more similar to ANH), and I don't really know how to fix that in the casts, since they were built for ESB style. Though... it can be a hybrid! :)

The casts will require some sanding and trimming in some areas and around the edges.

I'll do a test with the other resin I bought as well to see if that works better on these types of casts. The one I've been testing with so far really sets rather quickly, even though I think I ordered the slow setting version. Though thin, the casts feel sturdy. I'll test their durability to see how they hold up to being dropped and such.

I'll keep you all posted.
 
That symmetrical project is a curious idea...one that (we know) was botched for the ROTS armor, in my opinion. I'm so used to seeing it as asymmetrical, but if it turns out as good as your picture it'll look great!
 
I'll add it to my scaled line once it's done.

Regarding casting from the current molds. So far the easiest and most consistent good result is the dome. The face mask is giving me some trouble because of the tusk tips not being picked up by the resin - I'm assuming it's because it isn't thin and free-flowing enough and cures too quickly, so never manages to seep out into that tiny space. Chest armor seems to be the second easiest piece to cast, whereas the shins are difficult because they are open molds and not closed 2-part molds like the rest. I could make the enclosing piece of the molds, sure, and it will be good practice for when the prints are ready to be molded, and then I'll keep people posted on how that goes, so I can cast the shins the same way as I'm casting the rest.

So far I have 2 perfect domes done, with no face masks being just as cleanly cast - either always missing part of the teeth or having air pockets in the resin. I'll keep working on it.

Both resins are durable and can be dropped, even thrown, without chipping or breaking, but one of the resins is clear and always comes out with tons of air bubbles visible on the inside, but it's hard to see if there are air bubbles in the surface.

So basically... domes will be the easiest to cast and with minimal cleanup.
 
It sounds like you are making some real progress.

So basically... domes will be the easiest to cast and with minimal cleanup.

I remember you previously stating that the parts you are making perfectly scale with the Kaiyodo kit. Do you have any plans on just offering the dome until the other parts come out more cleanly? I know that it would be a great option for people that have the Kaiyodo mask.
 
Well, I added a mounting system inside the dome that would ensure a perfect placement on my face mask and that would be in the way when paired with anything else. Also, the reason I went back to working on the prints is because the work masters are a tiny fraction smaller, and the casts I'm doing now would be smaller still, as they are second generation casts. Something I never really considered when printing the pieces originally that there would probably be generational loss each time it was molded. Stupid really, but I was so set on perfect sixth scale pieces that reproduction really didn't factor into my thinking back then, I'm afraid to say.

However, I can try and see if the casts still look okay on the Kaiyodo face mask and post some pictures and if people are okay with that and are able to sand the dome mount down, then sure, I could probably offer b-grade domes for customizers.
Yeah...that would be cool to see. Interested!
 
That's great! Shaving the mounting system shouldn't be too hard. Count me in if they fit together size wise!
 
These past few weeks has been hell. I have come to realize that I won't be able to produce this project, as I got sick from the casting resin. Yeah, I know, bummer. But fret not, the project will be released, just not by me. There will be an update on that later.

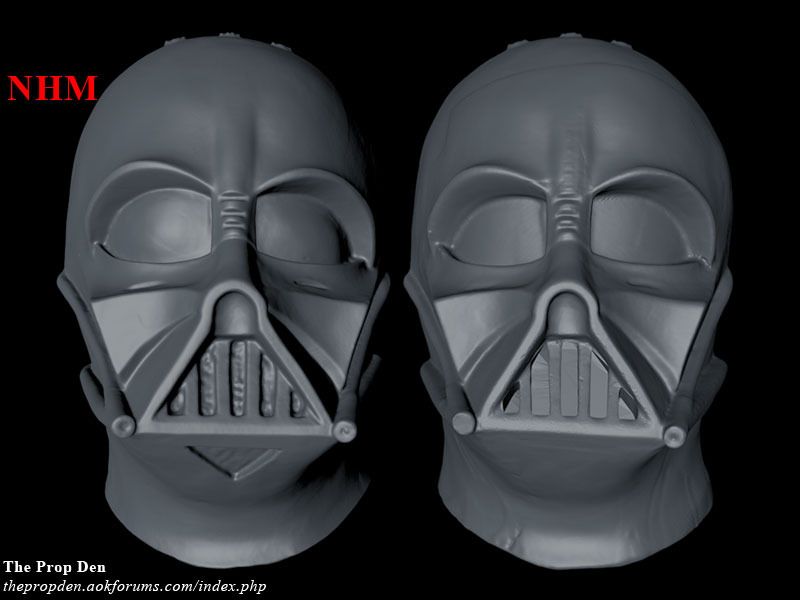
Going all-out with this latest and final batch of 3D models for the v2 line, I've had the face mask re-scanned and below you can see a comparison between the new scan on the left and my old scan on the right. Though being fantastic for what I had available and with the skill level I had when scanning the face mask, there were a lot of flaws in both the scan as well as the assembly. Even though I got better at scanning, I never really wanted to revisit scanning the face mask due to how complicated it is to scan something like that with a device where the laser line and camera were at a 30 degree angle from each other. I can tell you, those undercuts and structural overhangs were a major pain in the rear - whenever I was finally able to see a specific area in the view-finder, the laser line was unable to reach it due to something blocking. For the face mask alone it was 2x15 hours just the scanning and double or triple that time to assemble it afterwards, and what you saw in the v1 print was the best I could make it. These new scans - I'll also get an ESB specific version done - are in a whole other ballpark and barely any work is required on the prints when they are made. And unlike the first batch, where most of the armor pieces were printed in regular HD due to all the flaws, this current batch will be all Ultra HD.
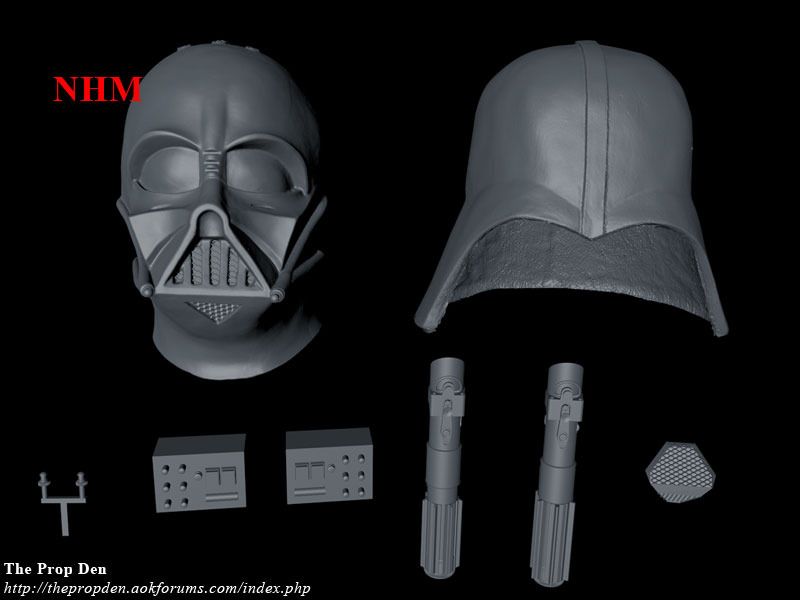
Anyway... here's the face mask scans.
TM-Scan-006_zpsrzzkenmw.jpg


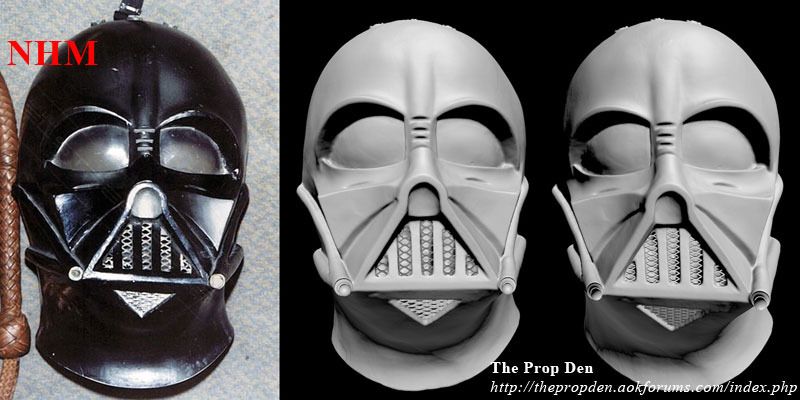
While working on this new scan, fitting it with tusks and grills, I first noticed that I had initially made the tusks too small for the v1 print batch. So those were re-scaled and fitted to the mask. Secondly, when adding the grills I noticed that even though they looked right, there was something off. Counting the gaps in the grills visible in the middle teeth gap, I realized that the grill model was too narrow top-down, so I had to rescale things, and even though it looked weird at first, it was infinitely more accurate to the reference.
Vader-004_zpswuxjtiih.jpg


And here is the new grill in close-up.
Vader-007_zps3btifcwr.jpg


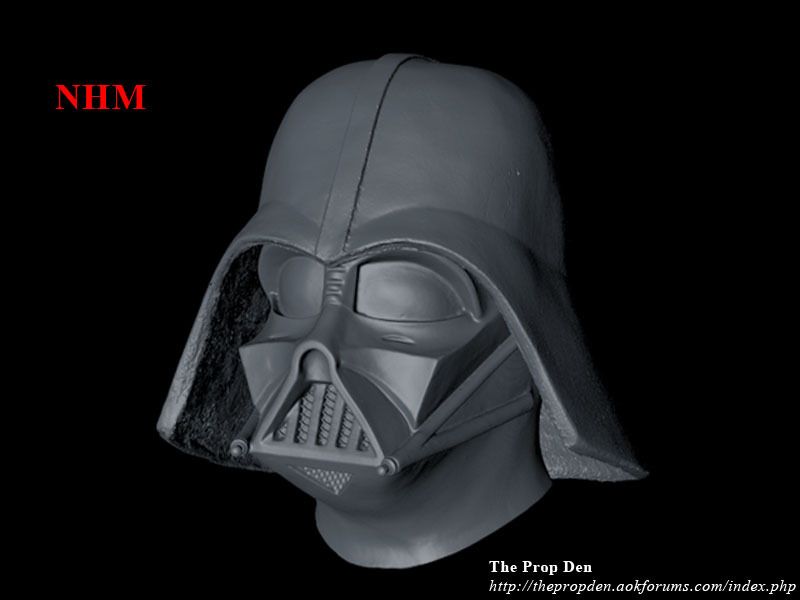
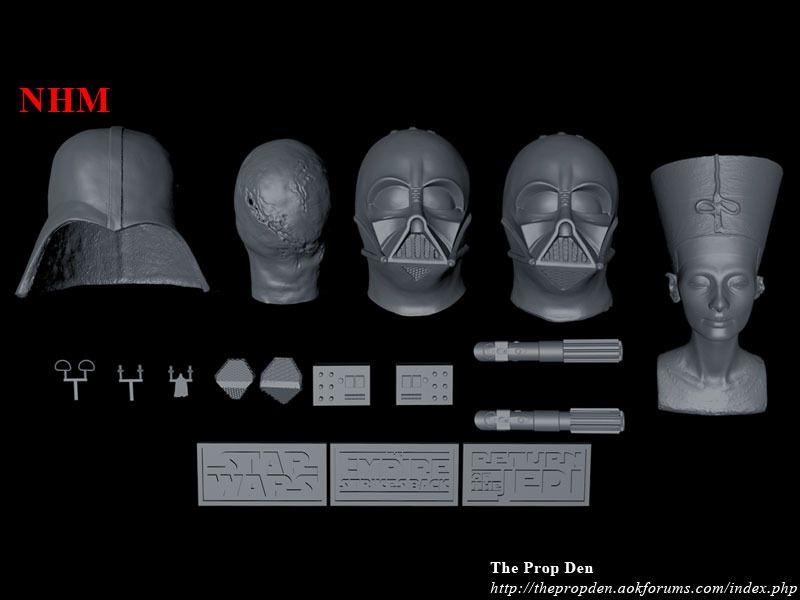
Never being too fond of the printed ANH dome, due to a misaligned scan slice covering the most important part of the dome - the Y-crease widows peak area - I went back to an older scan that was actually sharper, but incomplete. Doing a little Frankensteining on the two scans, basically cutting up the new scan, removing the surface layer, so only the inside layer was left, I started patching up the old scan and closing the holes. The only place the new dome scan outer surface is seen is at a hole at the top of the old dome scan, and the inside rim down at the brow at the widows peak area. Everything else is the old dome scan. I had to get my old computer out of storage, so I could use the scanning software to align and merge the models into the final piece. There are a few small holes left in the geometry, but those will be closed manually.
Here it is with the new ANH face mask scan:
Scan-v2-001_zpstvecm2f6.jpg


Lastly, since I knew this was gonna be the last batch for this project I decided to redo the lightsabers as I mistakenly had them printed in the wrong measurements previously - yup, my stupid beginners mistake - making one longer than the other. Activating a trial in my 3D viewing software I was able to scale the models, enlarge the D-rings a little and eventually export as .stl files ready for printing. I'll print separate D-rings just in case the attached ones makes it a molding and casting nightmare. Wasn't able to make a hole in the area where they attach, otherwise I would have removed the D-ring from the models, so molding and casting would be easier.
Furthermore, since some of the rods on one of the ESB belt boxes snapped during the many shippings back and forth I decided to have those re-printed as well. And never really liking the way the red light turned out, I decided to redo those and make them more accurate. I got a little friendly advice on how they should really look and I think I managed to get it looking pretty decently accurate with my meager skills.
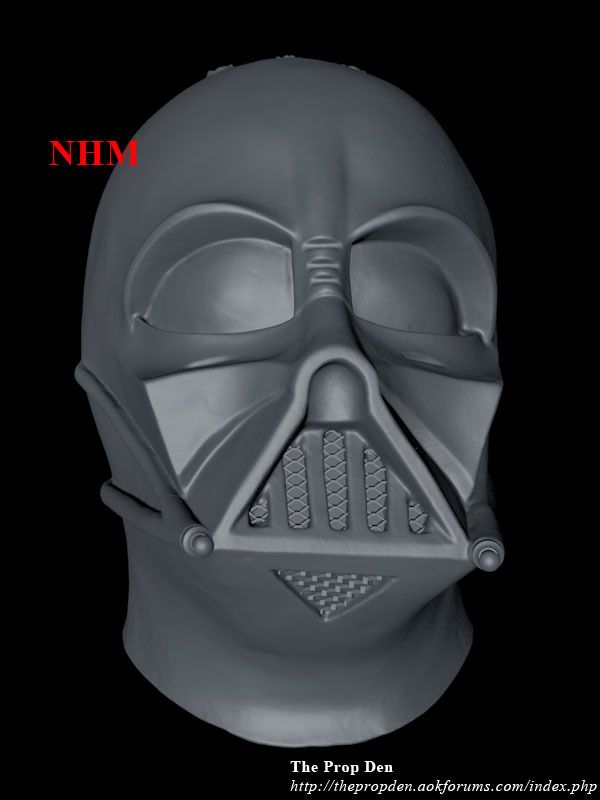
After fitting the upper and lower ANH grills to the face mask, I removed the mask model and fused the two grill models into a single model that will be printed separately.
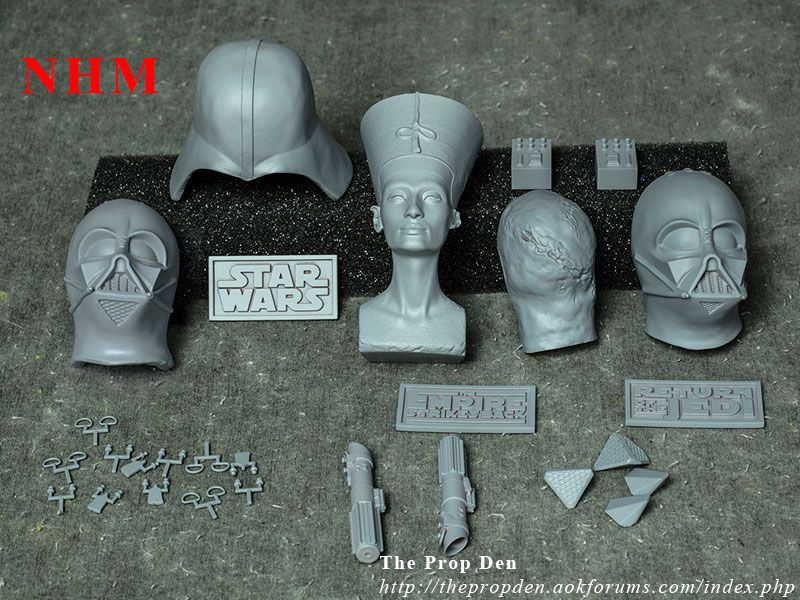
This is the prepared models so far. What is missing is a complete ESB specific face mask where I will add grills and tusks, similar to the ANH one.
Vader-010_zpskassjeab.jpg
 
Last edited:
An impressive amount of work! Very sorry to hear about the resin making you sick. That's terrible. Are you going to be alright as long as you stay away from it?


Sent from my iPhone using Tapatalk
 
Yeah... things are going okay. Just a little rough.

Working on the scans and models for the v2 line. Better scans, reworked and resized models. Worked until the last minute of the trial on the software I was using with some additional tweaks to make things more accurate. As it stands now, I won't be able to save anymore, so I can't make anymore tweaks... so this is as good as it gets. I probably won't print the dome, but I am trying to find another source for some of the parts and previous scans, so this project isn't over yet.

The Nefertiti bust is a scan of the actual piece that has been shared online.

And in the last minutes of the trial I even worked up a 1x4x9 Monolith from 2001 just for fun.

Vader-016_zpsxyzwsm4j.jpg


This will probably be the last update in a while... these past 42 days have been rough as hell... so I need a break.
 
Last edited:
Back
Top